Adding Images
Administrators can manage which images are available for Users to insert into editable image modules within Radiate campaigns.
This feature is available for users with the Administrator role.
In this article
If your images are stored in a content manager:
This applies if your email images are hosted by a 3rd party corporate content manager or your ESP, and your ESP does not have an open image API (e.g. SFMC).
You will need to first add your images to your content manager's image library. Once added, make a note of the image URL.
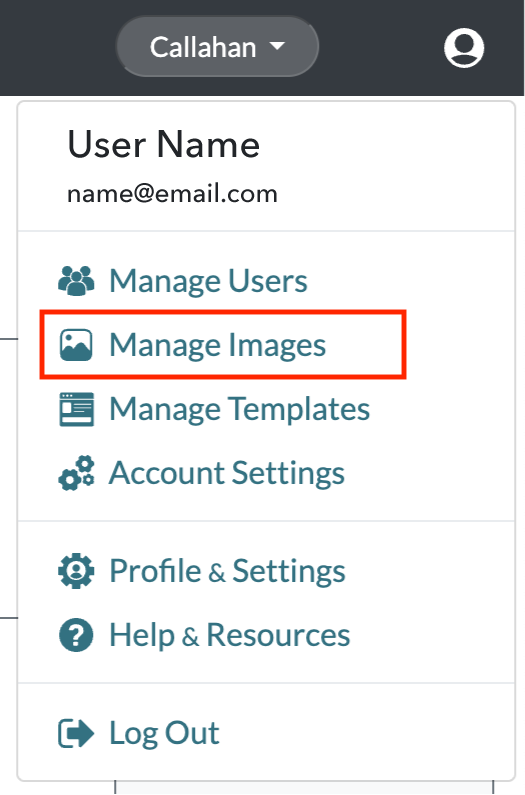
Then, log into Radiate and click on the User Options menu in the top right of the Radiate screen. Select Manage Images from the dropdown menu.
From the Manage Image Library screen, click on the Add Image button at the bottom of the window.
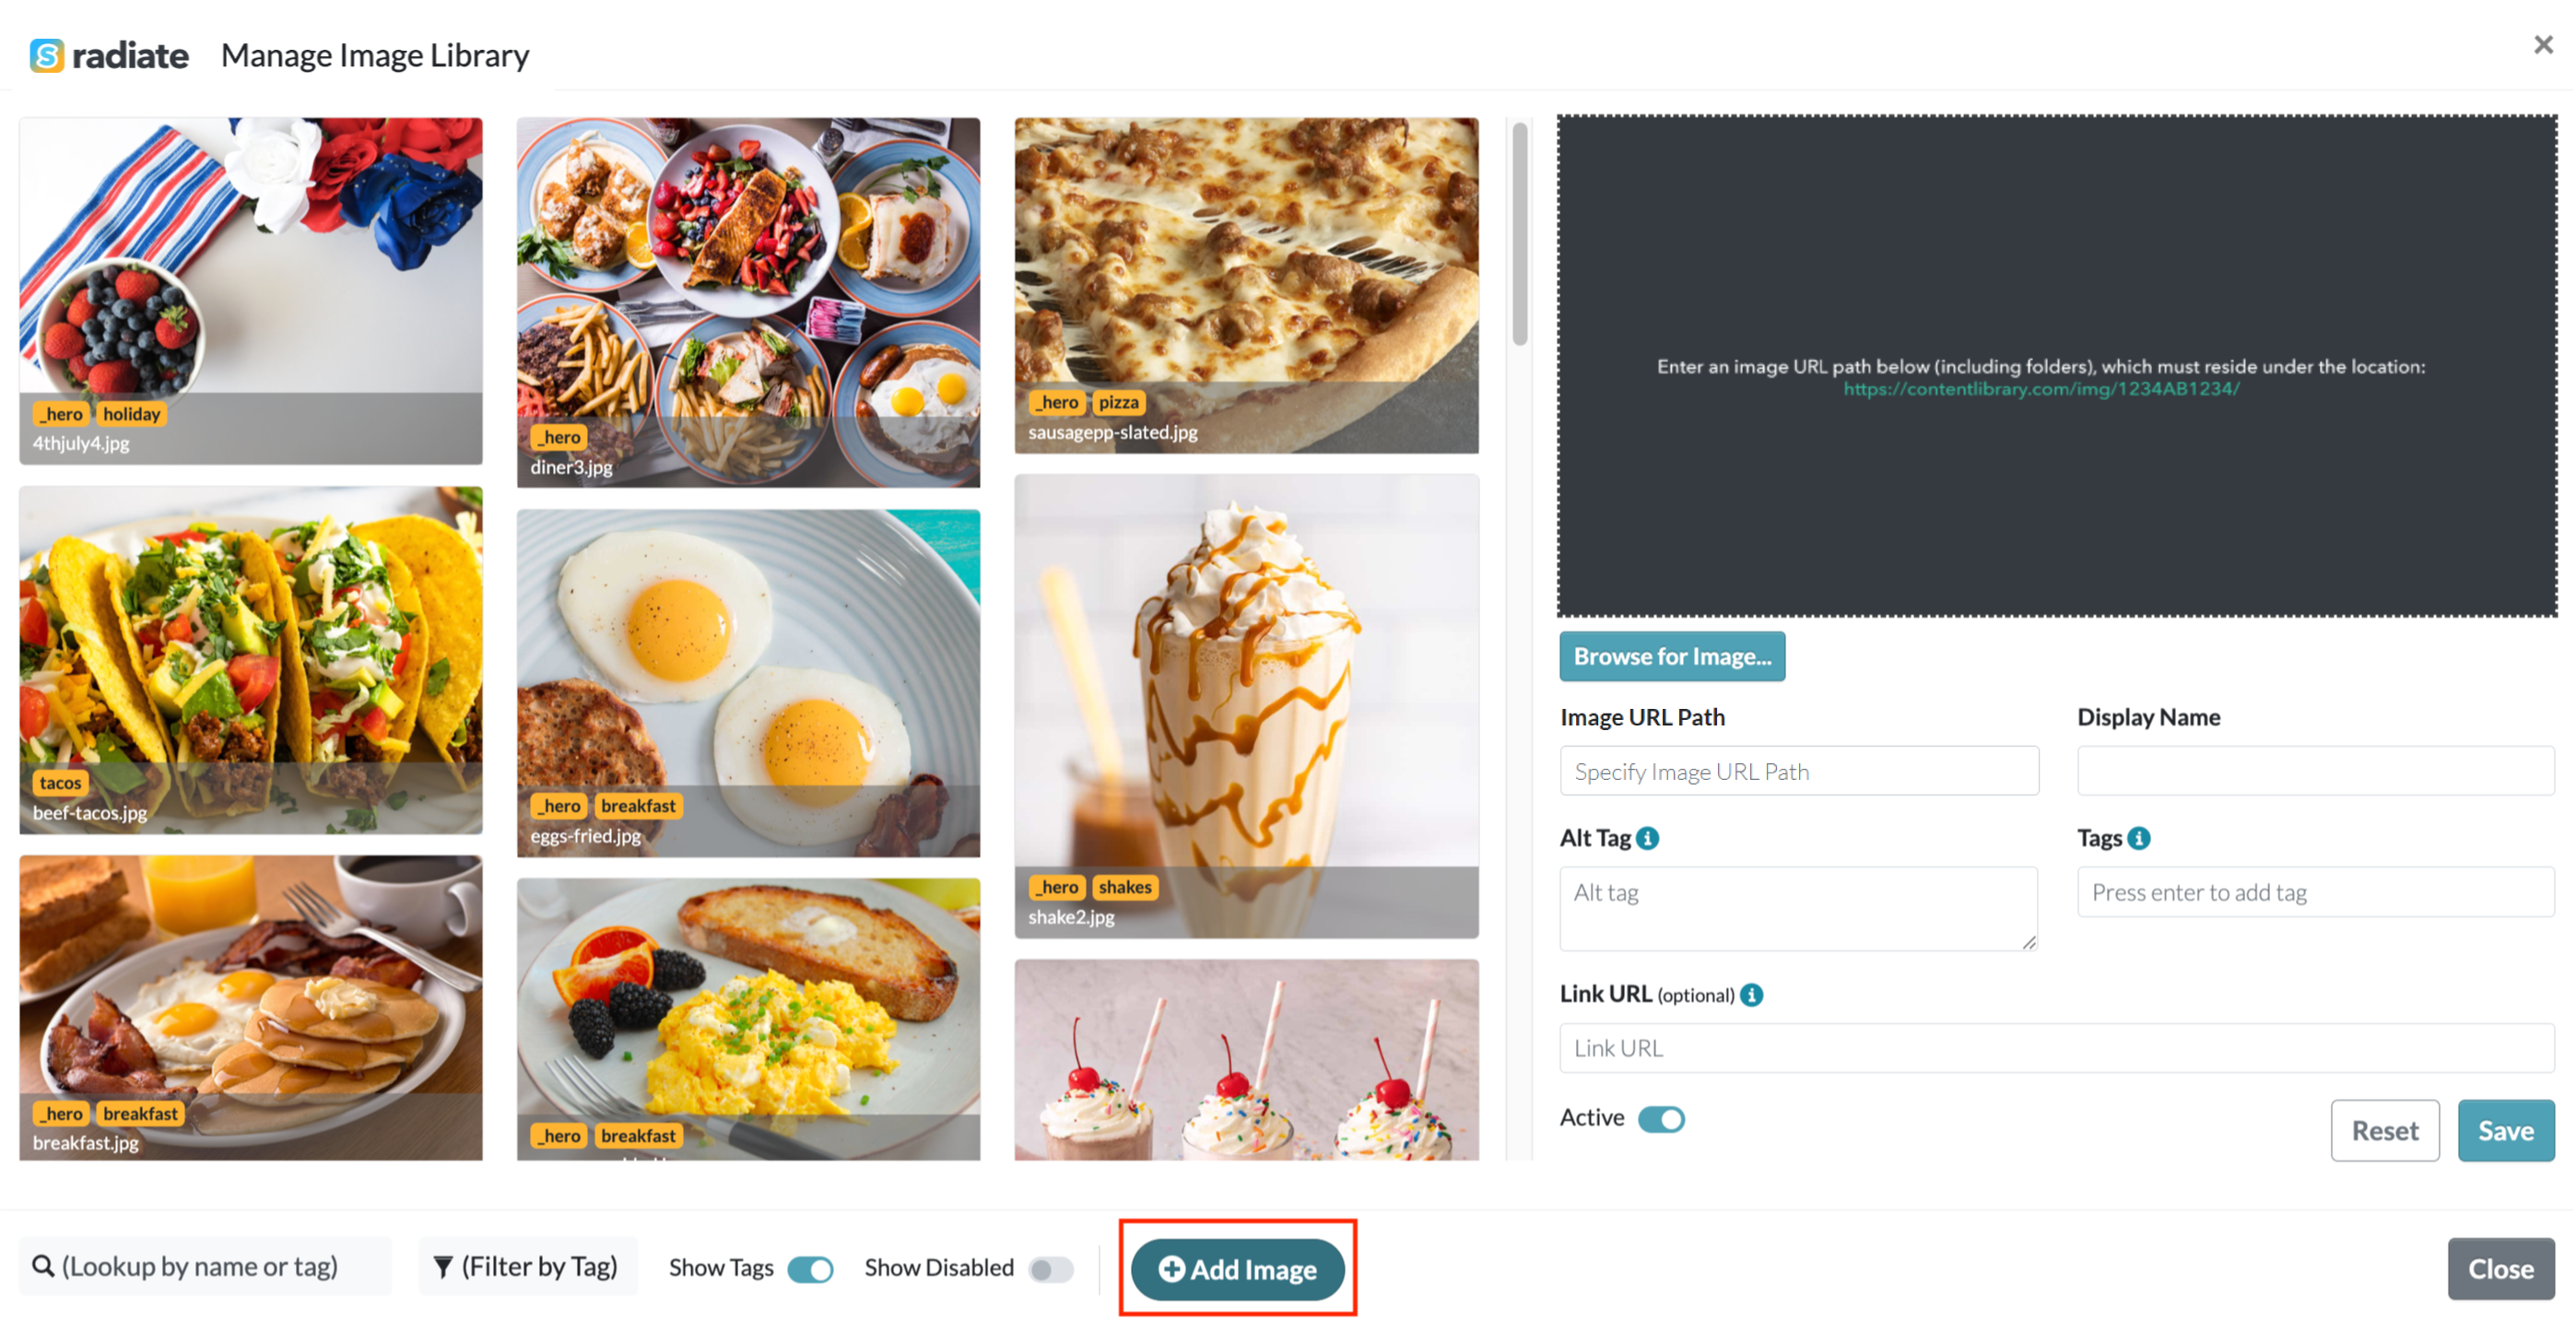
The Add Image window will open on the right side.
- For Image URL Path, enter the image URL from your corporate content manager.
- The image path must begin with the base URL shown in green text.
- Once the link is pasted, the image will appear in the box above.
- For Display Name, enter a descriptive name for the image. This name is what users will see when they are selecting images for their campaigns.
- For Alt Tag, enter the image alt tag you would like to display for subscribers when their images are disabled.
- A good rule of thumb is to keep alt tags between 5 to 15 characters
- For Tags, enter the keywords you would like to file the image under within the Filter by Type menu for Radiate Users.
- Tags should be short and descriptive.
- Click in the Tags box to select from existing tags, or type a new tag va
- If images are used for a specific image block in the email, add a tag to identify which block the image should be tied to.
- For example, use "_hero" for hero images, or "_headline" for headline images.
- Click on the info icon to see if there are specific tag guidelines for your account.
- Link URL is optional. If a link is entered here, the image will include a hyperlink to the specified site or page.
- Designate whether you would like the image to be Active in the Image Library.
- Set the image to disabled if you don't want it to be available for users to select.
- Click the Save button to add the image to the Radiate Image Library.
If your images are hosted by an ESP with an open image API:
This applies if your email images are hosted by your ESP and Sageflo is able to load images directly into your ESP via their API (e.g. Responsys).
Log into Radiate and click on the User Options menu in the top right of the Radiate screen. Select Manage Images from the dropdown menu.
From the Manage Image Library screen, click on the Add Image button at the bottom of the window.

The Add Image window will open on the right side.
Click Browse for Image or drag the image into the gray box.
- The File Name will automatically file in.
- For Display Name, enter a descriptive name for the image. This name is what users will see when they are selecting images for their campaigns.v
- For Alt Tag, enter the image alt tag you would like to display for subscribers when their images are disabled.
- A good rule of thumb is to keep alt tags between 5 to 15 characters
- For Tags, enter the keywords you would like to file the image under within the Filter by Type menu for Radiate Users.
- Tags should be short and descriptive.
- Click in the Tags box to select from existing tags, or type a new tag value and hit Enter.
- If images are used for a specific image block in the email, add a tag to identify which block the image should be tied to.
- For example, use "_hero" for hero images, or "_headline" for headline images.
- Click on the info icon to see if there are specific tag guidelines for your account.
- Link URL is optional. If a link is entered here, the image will include a hyperlink to the specified site or page.
- Designate whether you would like the image to be Active in the Image Library.
- Set the image to disabled if you don't want it to be available for users to select.
- Click the Save button to add the image to the Radiate Image Library.
If your images are hosted by Iterable:
If you will be hosting images in your Iterable account, loading images in Radiate is a two-step process:
- Load your images into your Iterable account:
- Log into your Iterable production account.
- Go to Content and select the Templates option from the dropdown.
- Navigate to the Sageflo content folder and search for the template called Radiate Image Library.
- Open the template and select the option to Edit design.
-
Click on the blue Browse button in the image container.

Radiate Image Library Template in Iterable - Search for the Sageflo folder in the File manager and click on it to open the folder.
-
Click on the blue Upload button and navigate to the image(s) you would like to load.

Iterable File Manager
- Next, go to Radiate to add the images to the Radiate Image Library.
-
Log into Radiate and click on the User Options menu in the top right of the Radiate screen. Select Manage Images from the dropdown menu.

User Options Menu - Manage Images - From the Manage Image Library screen, click on the Add Image button at the bottom of the window.
-

Manage Images - Add Image Button
-
- The Add Image window will open on the right side.
- For Image URL Path, enter the image file name (e.g. your-image-name.jpg).
- Only include the image name, not the full file path.
- Once the image name is pasted, the image will appear in the box above.
- For Display Name, enter a descriptive name for the image. This name is what users will see when they are selecting images for their campaigns.
- For Alt Tag, enter the image alt tag you would like to display for subscribers when their images are disabled.
- A good rule of thumb is to keep alt tags between 5 to 15 characters
- For Tags, enter the keywords you would like to file the image under within the Filter by Type menu for Radiate Users.
- Tags should be short and descriptive.
- Click in the Tags box to select from existing tags, or enter a new tag value and hit Enter.
- If images should only be used for a specific image block in the email, add a tag to identify which block the image should be tied to.
- For example, use "_hero" for hero images, or "_headline" for headline images.
- Click on the info icon to see if there are specific tag guidelines for your account.
- Link URL is optional. If a link is entered here, the image will include a hyperlink to the specified site or page.
- Designate whether you would like the image to be Active in the Image Library.
- Set the image to disabled if you don't want it to be available for users to select.
- Click the Save button to add the image to the Radiate Image Library.
- For Image URL Path, enter the image file name (e.g. your-image-name.jpg).
-


If you have any questions, reach out to your Radiate account manager.